Are you a new traveling speech therapist or are you transitioning to being an itinerant speech language pathologist? Are you feeling overwhelmed and need some SLP resources to help get yourself organized?
No need to panic. You’ve come to the right place to get organized. I’ve been an itinerant SLP for 15+ years. I’ve created this step-by-step guide and the Itinerant Clinician Starter Kit of FREE resources to help you get organized.
Step 1: Start with a schedule.
Building a schedule is often the most time consuming piece of getting started as a traveling speech therapist.
3 Tips for Getting Started with the Scheduling Process
1. Request classroom schedules.

You will be working with many different classrooms, so you will need to request a schedule from each teacher with whom you will be working. This includes daycare, preschool, 4K, and elementary classroom schedules.
Keep in mind that daycare students might have unique schedules due to family time commitments. Also, preschool and 4K classrooms tend to have start and end times that are slightly different between sites. Make sure to take all of this into account when scheduling.
2. Familiarize yourself with students’ goals.

Look at the present levels, IEP goals/objectives, and program summary for each student on your caseload. Then, organize important information. You want to note the following items.
-
Site, grade level, and age
Note each student’s site and grade level. If your students attend either AM or PM 4K, you want to specify that, as well.
With younger students, there are often huge differences in developmental abilities. Knowing the ages of the children helps with creating appropriate groups. You might want to record the age of your students in years and months for a better approximation of abilities. (i.e., Johnny 3 years; 4 months)
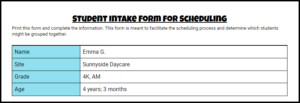
Do you need a tool to organize each student’s information? Use this Student Intake Form for Scheduling template.
-
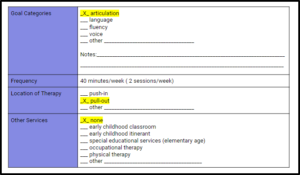
Goal categories
Next, make note of each student’s goal categories- language, articulation, fluency, or voice. When pairing students, it helps if the group is working on similar skills.
-
Frequency of services, location, and other services
You need to know how often each student receives therapy and the location of therapy (push-in or pull-out services).
If you are doing push-in therapy, you want to know the best times to work with your students. Typically, for younger students this is during circle time or free play. For elementary students, the best times tend to be during reading or writing blocks. Remember to look at the student’s goals to make sure that you will be able to address these during push-in times.
If you are doing pull-out therapy, you want to avoid times in which it will be difficult for students to exit the room. You typically want to avoid taking a student during recess, specials, reading, math, or writing.
If the student receives other services, communicate with the other providers about the student’s schedule. This avoids double booking a child’s therapy time with other specialized staff.
-
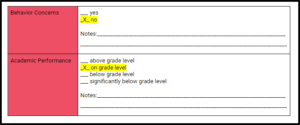
Academic and functional skills
Read the present levels of the IEP to determine academic and functional skills. Specifically, you are determining which students might have behavioral challenges or might be functioning significantly below what is expected for their grade level. This information helps determine which students should be grouped and which ones should be seen independently.
3. Make a rough draft of your schedule.
Next, organize your student intake forms by site. Then, take a blank schedule and plug-in your students.
The Itinerant Clinician starter kit includes a Schedule template. Directions for creating a schedule are included in the template.
You want to be efficient with your therapy schedule in regards to travel. Therefore, you want blocks of time at each site in which you can see all of your students. However, sometimes this is not possible because of AM and PM 4K classes.
Here are some more helpful tips:
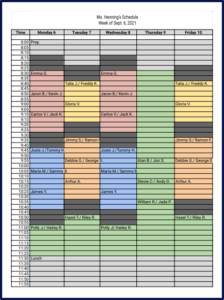
- Color code each site.
- Allow at least 15 minutes for travel between sites.
- Remember to schedule your prep and lunch.
This is an example of a final draft master schedule for the semester/year. If you want a schedule specific to each week, just make a copy of your master schedule and edit.
Step 2: Build a relationship with your sites.
Once you have a rough draft of your schedule, share it. Provide a copy for the teachers you will be working with, the administrators at your sites (i.e., principals, childcare directors, etc.), and administrative assistants for each site.
When you share your schedule, take this opportunity to start building a relationship with your sites.
3 Tips for Building a Relationship with Your Sites.
1. Meet and greet.
Make sure to introduce yourself (in-person) to each teacher, administrator, and administrative assistant. This helps put a name with a face and starts building a working relationship. Express that you are excited to work with their students and ask questions about the classroom or site.
2. Provide your contact information and your schedule.
Give your contact information (with hard copy and an email) to each teacher, administrator, and administrative assistant. This can include your email and phone number. Make sure to ask for their information, as well.
Keep the scheduling information that you provide simple. Most teachers will be overwhelmed if you share a full schedule.
I typically write down therapy times specific to each teacher. However, I email my full schedule to each school administrator and school administrative assistant for future reference. This helps them keep track of when I’m at their site.
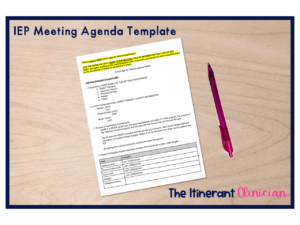
3. Provide an IEP at a glance.
It is important that teachers and administrators have the best information about your students. Many student management systems have an option to print a document called IEP at a Glance. This provides the necessary information about each student for the teacher to read. Make sure to get consents signed to share information, if needed.
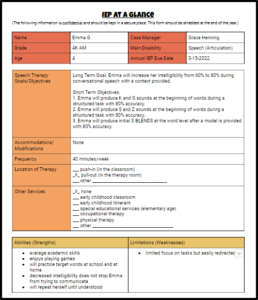
The Itinerant Clinician starter kit includes an IEP at a Glance template.
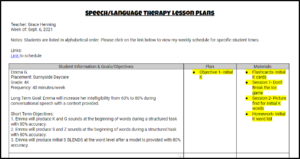
Step 3: Make a lesson plan.
Now that you have a tentative schedule and have read your students’ IEPs, it’s time to make a lesson plan. Although it takes a bit of time to complete, a lesson plan helps you stay organized and is best practice.
In the world of speech therapy, there isn’t a right or wrong way to write a lesson plan. I advise to make it as simple as possible. The easier the plan, the less time it will take to update each week.
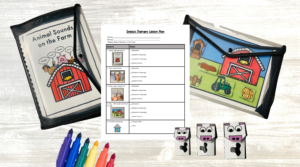
The Itinerant Clinician starter kit includes a Lesson Plan template.
3 Things to Include in Your Lesson Plan
1. General information
This includes your name, the date of the plan, any special notes to your administrator, and any important links.
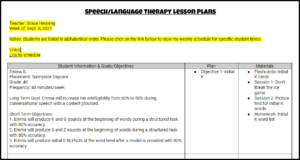
2. Student information
Include the student’s name, placement (site), grade, and frequency of services. Add each student’s long term goals and short term objectives.
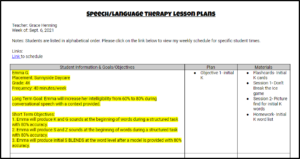
3. Plan and materials
Under the plan column, briefly state which goal or objective you are addressing with the student. Then, in the materials column, indicate the items you need for each student.
Step 4: Prepare your therapy bag.
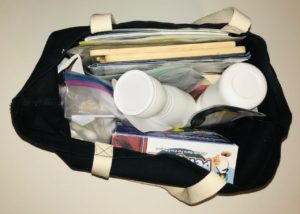
When your first day of therapy arrives, you will need to pack your therapy bag. When you are a traveling speech therapist, you will need to make sure to pack the essentials.
5 Things You Will Need in Your Therapy Bag
1. Weekly therapy materials.
2. A storage clipboard to keep your important documents in and to serve as a desk.
3. A pencil case to hold your necessary supplies.
4. Binders or folders that contain each student’s information.
5. A timer to keep you on schedule.
For a more in-depth look at what you will need in your bag, read this post.
Step 5: Build relationships with families.

You have a schedule, lesson plan, and a packed therapy bag. You took the time to develop a relationship with your sites. Now it’s time to build relationships with your families.
3 Tips to Connect with Families
1. Introduce yourself to each family.
It is important to form a relationship with each family. Introduce yourself by making a quick phone call or sending a short email to each family. In addition to this initial contact, send a note home that introduces yourself and provides contact information.

The Itinerant Clinician starter kit includes a Meet the SLP template.
2. Get to know more about your students and families by sending a survey.
Surveys are a great way to get to know your families and students better. This is a perfect opportunity to get parent contact information (which you will need when scheduling meetings) and get to know some basic information about their child.
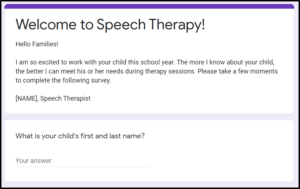
The Itinerant Clinician starter kit includes a Parent Survey template. The survey can be sent via email or printed out and sent home.
3. Take other opportunities to meet parents.
Sometimes meeting families is difficult. They are busy and often don’t have time to return emails or phone calls. If you have trouble contacting a family, consider meeting them during open house or parent-teacher conferences. Pick-up and drop-off times might also be ideal for getting in a quick introduction.
Step 6: (Optional) A Year at a Glance makes planning easier the following year.
Congratulations! You are ready for your first day of therapy.
One last thing, which is totally optional…
Your first year will probably pose many time challenges in regards to planning. That’s why you want to make sure you take good notes so you can recreate the same activities the following year. This will save you tons of time.
I keep my themes/activities recorded in a spreadsheet that is divided into months, sessions, and age/disability categories. This makes planning super quick and easy, which every traveling speech therapist values.
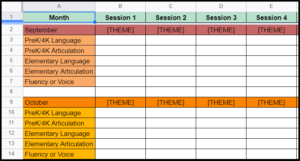
The Itinerant Clinician starter kit includes a Year at a Glance template.
Key Points
Here are the key takeaways for getting started as a traveling speech therapist.
- Start by making a schedule. First, get all classroom schedules. Then, gather important student information that will help determine groupings.
- Once your schedule is completed, share it with your sites. This is also an opportune time to build relationships with teachers, administrators, and administrative assistants.
- Next, make a simple lesson plan.
- Pack your bag with essential items that you will need for therapy.
- Take time to build relationships with families.
- Lastly, make sure to record the activities that were successful so you can save time planning the following school year.
Grab Your Free Itinerant Clinician Starter Kit today!
Need help getting started as a traveling speech therapist?
This is what you will get in the FREE Itinerant Clinician Starter Kit available through my TPT store. All forms are compatible with Google™ Docs, Sheets, or Slides. You can download a copy of all the files to your Google™ Drive and edit as needed.
- Schedule template
- Student Intake Form for Scheduling template
- Lesson Plan template
- IEP at a Glance template
- Therapy bag checklist
- Meet the SLP template
- Parent Survey template
- A Year at a Glance template
The next step…
If you are an itinerant speech therapist, you’ll probably be working with preschool and 4K students. Get some tips on making the perfect preschool lesson plan. Check out An Ultimate Guide to Creating Preschool Speech Therapy Lesson Plans.
If I could go back in time, I would tell myself one thing to save hours of time…MAKE A LESSON PLAN LIBRARY! Although there is some time spent initially creating each lesson, a good plan can last your entire career. My advice to you…Build your lesson plan library today to save time tomorrow! Start by grabbing your free preschool lesson plan today!